Water Damage Restoration: Our Step-by-Step Process
From assessment to drying to rebuild — our water category process explained. Typical 3–7 day timeline. Greater LA: 747-335-5310.

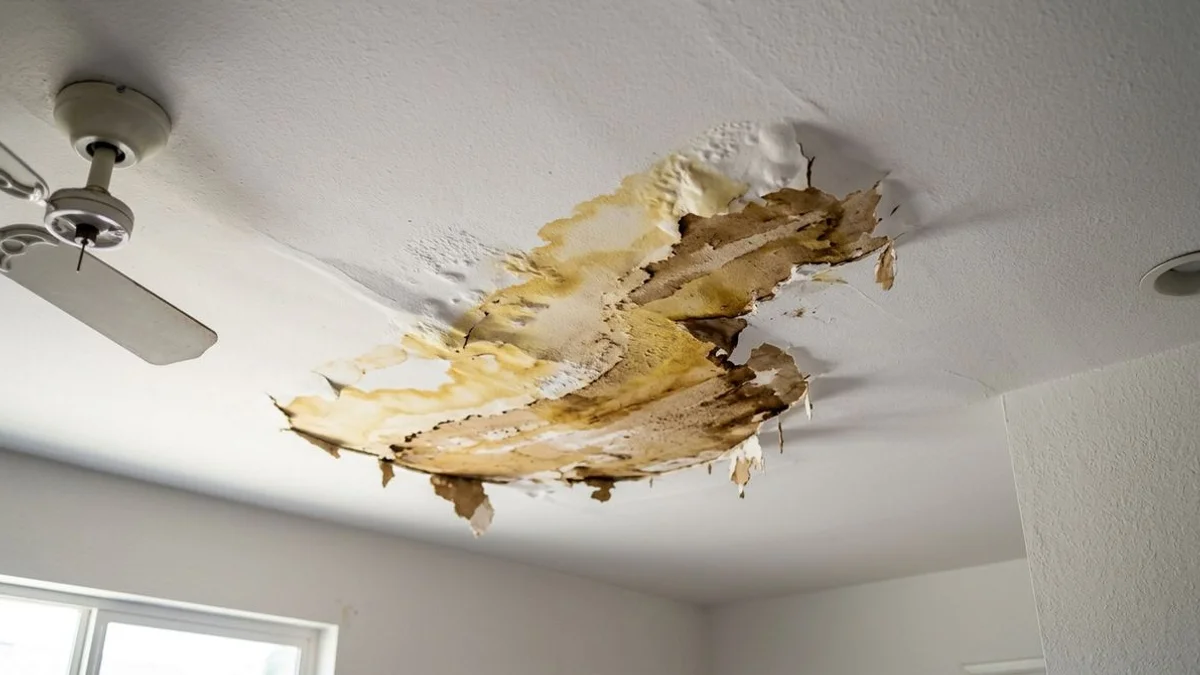
Every property emergency brings its own chaos. We know that most homeowners have never seen the complete water damage restoration process from start to finish. The reality is far more involved than just extracting water and running some fans.
Our approach relies on a sequenced, measured procedure to protect your home from secondary damage and support your insurance claim.
The following water restoration steps break down the specific tools and data points involved. We want to show you exactly what our water damage restoration service actually looks like, day by day.
Step 1: Inspection and restoration Cat-1/2/3 classification
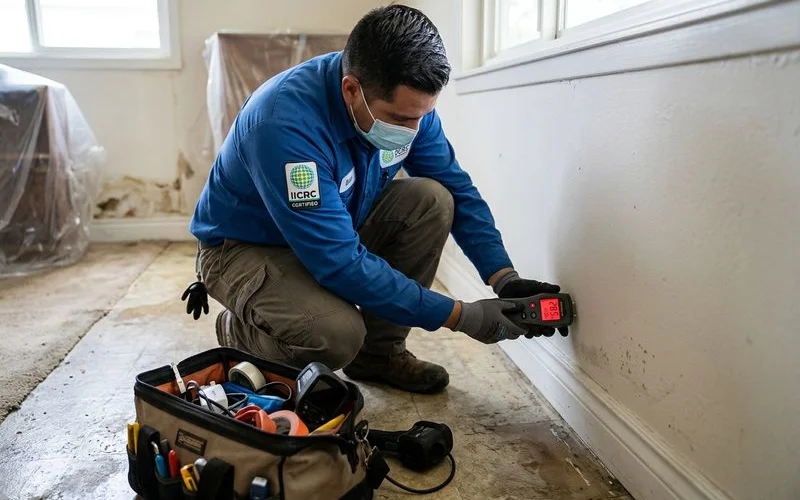
The first hour on site is purely diagnostic. The first pass should identify the water source, affected rooms, material types, visible safety concerns, and documentation needs. Photos and moisture notes can help organize the insurance file. If you’re not sure whether a leak is active yet, our guide on the signs of hidden water damage walks through the visual, olfactory, and behavioral cues to look for first.
Moisture meters, photos, and thermal-camera checks may be used during this phase when the provider has the right equipment and the site conditions make the readings useful. We classify the water source per the S500 guidelines:
- Category 1 (clean): Supply-line failures, water heater leaks, or ice maker lines present the lowest risk.
- Category 2 (gray): Appliance overflows, dishwasher discharges, or aged Cat-1 water carry significant biological contamination.
- Category 3 (black): Sewage backups, storm flooding, and standing water older than 48 hours require maximum PPE and specialized disposal.
Classification dictates everything that follows. We use these categories to determine containment requirements, salvageable materials, and specific cleanup chemicals. Your adjuster will also need to know the Class of water damage, which measures the amount of water and difficulty of drying. We document whether the loss is a simple Class 1 or a dense Class 4 situation involving plaster or concrete.
Step 2: Water extraction
Standing water comes out first, usually within the first hour. Extraction equipment may be used to remove standing water and reduce how much moisture remains in flooring or nearby materials.
The EPA and FEMA strongly recommend starting this drying process within 24 to 48 hours to prevent mold growth.
Our extraction strategy aggressively targets hidden water. For carpets and pads, technicians operate motorized, weighted extractors. We ride on these machines to compress the flooring with our body weight. This physical compression squeezes out the water like a sponge.
More complete extraction can reduce drying time, but the right method depends on material, water category, and whether flooring can be saved. For Category 3 jobs, the process shifts entirely. We remove and bag contaminated carpet, pad, and porous wall materials for compliant disposal rather than attempting to dry them. The water itself is simply too biologically active to leave absorbed in any structural materials.
Step 3: Structural drying setup
We install two main classes of industrial machinery to handle the evaporation process:
- LGR dehumidifiers: Dehumidifiers reduce humidity so wet materials can release moisture.
- Centrifugal air movers: Air movers help keep air moving across damp surfaces.
These specific tools do most of the actual moisture removal. Equipment count depends on room size, materials, water category, humidity, power access, and how wet the assembly is.
We scale up the equipment count for larger losses. Commercial-grade drying units can remove significant moisture from the environment when correctly sized for the job.
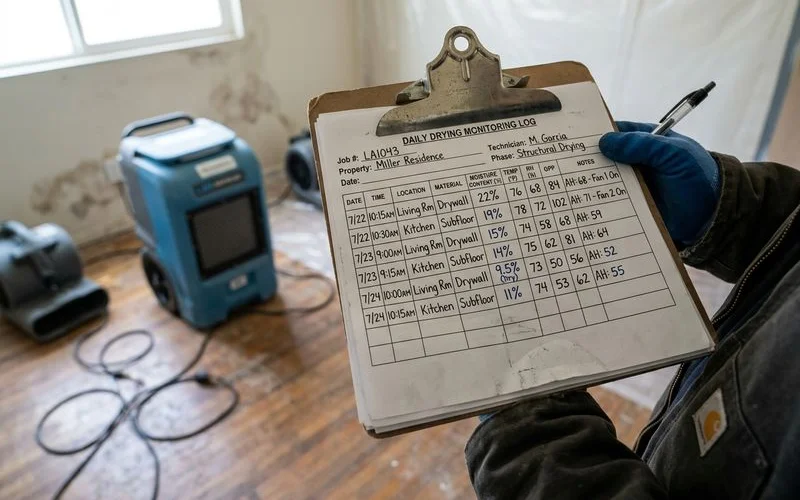
Step 4: Daily monitoring and adjustment
Moisture readings should be logged on affected materials and compared with dry areas so progress can be tracked.
Our daily log maps out what is drying fastest and slowest. Daily readings and timestamps can help explain why equipment was used and when it should be moved or removed. We shift air movers and dehumidifiers around based on this concrete data.
This documentation step represents the most important and least visible part of the job. We know that a drying setup that looks fine to the naked eye can still leave hidden moisture in wall cavities or under flooring. That trapped moisture can become a mold concern if it is not found and dried.
Step 5: Antimicrobial application
Structural framing and subfloors that touched contaminated water may need cleaning or antimicrobial treatment depending on the water category and material. Category 2 and Category 3 jobs may require additional cleaning steps for preserved surfaces.
Our preferred treatments include botanical disinfectants like Benefect Decon 30. Any product should be used according to label directions and matched to the material and job conditions.
We use these sprays to reduce the risk of biological problems while the drying phase finishes. Antimicrobials are never a substitute for thorough drying, but they provide a critical layer of protection for your property.
Step 6: Verification, meeting the moisture target
A dry-area baseline can help compare affected materials against similar unaffected materials before equipment is removed.
Our technicians must verify several hard metrics before pulling the machines:
- Wood: Compare readings against dry-area materials and the job documentation target.
- Concrete subfloors: Use the appropriate meter or test method for the flooring plan.
- Drywall: Compare the affected area with nearby dry material before closing the drying phase.
Documentation targets should be clear before the drying phase is closed. Carrier requirements vary, so photos, notes, and readings should be organized for the adjuster discussion.
Step 7: Reconstruction handoff (or not)
Reconstruction may be handled by the same provider or a separate repair contractor depending on the job, carrier, and selected scope.
Project documentation and repair-scope notes can help the repair phase move into drywall, paint, flooring, cabinetry, or finish work. The industry average for claim negotiation between separate mitigation and rebuild companies can add weeks to a project.
Ask who handles each phase, what is included in the written estimate, what remains separate, and how timeline changes will be communicated.
Typical timeline
Prompt mitigation is usually important because policy language may require reasonable steps to prevent additional damage. Every residential water-damage event follows a predictable schedule based on the severity of the loss.
Mitigation and Rebuild Schedule
| Project Phase | Expected Timeline | Key Actions Completed |
|---|---|---|
| Emergency Response | Day 0 | Call, request review, scheduling, extraction plan. |
| Initial Drying | Day 1 | Drying equipment setup, antimicrobial application, first readings. |
| Active Monitoring | Days 2-5 | Daily moisture tracking, equipment adjustment. |
| Verification | Days 6-7 | Drying target reviewed, equipment removed, post-drying inspection. |
| Reconstruction | Weeks 2-4 | Drywall, paint, flooring, and final finishes installed. |
Core mitigation is often planned in stages, with timing depending on the size and severity of the loss. Larger commercial losses or Category 3 events will naturally scale up this structural drying timeline.
Our team manages the reconstruction phase based on the specific material estimate and replacement lead times. Call with the water source, affected rooms, access details, and insurance questions if you need guidance on the next step.